Recently I wrote an article on “Using ColorPort for QTR grayscale measurement and profiling” Today I’d like to talk about using i1Profiler v1.3 for QTR grayscale measurement and profiling. I’ve been using i1Profiler’s new “Measure Reference Chart” feature and the new i1Pro2 “Raven” device for a year and now that it’s officially released I can tell you about it.
i1Profiler is XRite’s new professional level application that anyone can download for free at XRite.com. While some of the features require a purchase or dongle, the “Measure Reference Chart” feature that we will use for this doesn’t require a purchase. Measure Reference Chart are new features in i1Profiler version 1.3.
Visit www.on-sight.com/download/ to download the 21 and 51 step grayscale workflow files that I’ve made for i1Profiler. These i1P workflow files can be installed at the following location:
Mac OS: Library>ApplicationSupport>X-Rite>i1Profiler>ColorSpaceRGB>MeasureReferenceWorkflows
Win XP: Documents and SettingsAll UsersApplication DataX-Ritei1Profiler>ColorSpaceRGB> MeasureReferenceWorkflows
Win 7 and newer: ProgramDataApplication DataX-Ritei1Profiler>ColorSpaceRGB> MeasureReferenceWorkflows
I’ve also made my Grayscale and Alt-Process profiling targets available with patches for the i1Pro, and iSis and DTP70 patches on separate layers that can be enabled. These profiling targets have large 21 step patches that come in handy with irregular alt processes and some images to help monitor the tonal scale during testing. The values of the 21 and 51 step targets are exactly the same as those from QTR. Feel free to use these targets for non-commercial purposes.
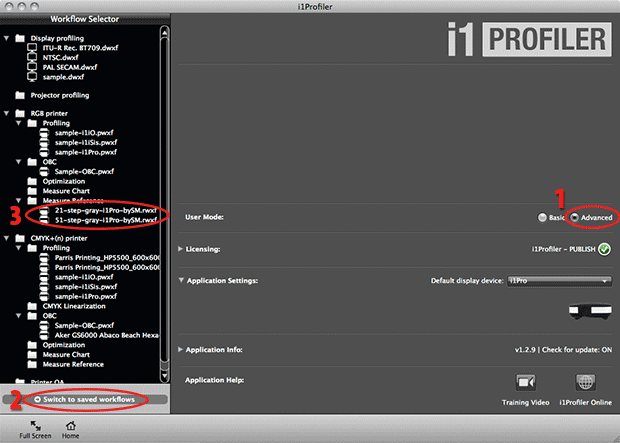
With the workflow files installed, launch i1Profiler, click on the “Advanced” User Mode on the far right side, click on “Switch to Saved Workflows” in the lower left side, find the “21-step-gray-i1Pro-bySM” workflow and click on it.
[Alternately you may use the “Measure Chart” feature in i1Profiler, enter your device, the size of the patches (8.3mm), the number of rows and columns of your profiling target and start measuring.]
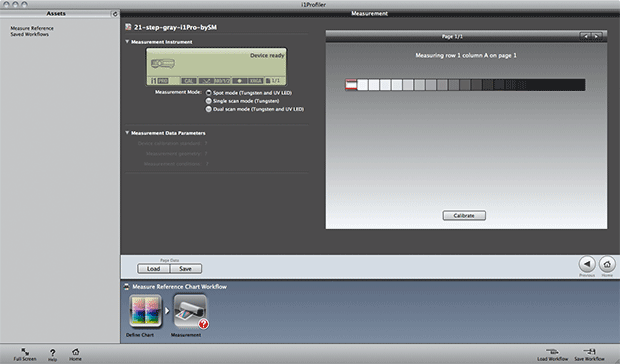
Now you can select your device, click on the “Measurement” workflow button below, calibrate your device and start measuring the patches. I recommend i1Pro users use the “Spot mode” as pictured below. i1Pro2 users should plan on using the Dual scan mode.
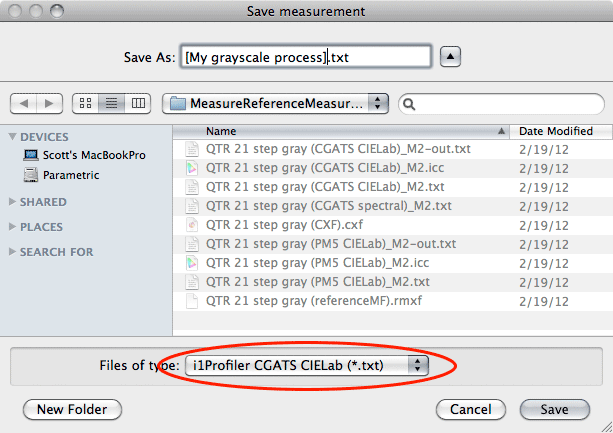
When you are done, save your measurements, choosing the “i1Profiler CGATS CIELab(*.txt)” format option.
You now have a measurement file that you can drag and drop onto the “QTR-Create-ICC” script to make an ICC Color Profile for your grayscale printing process! Of course, QTR users can also drag and drop this measurement file onto “QTR-Linearize-data” and use the linearization curve in QTR. Tip of the hat to Roy Harrington for his brilliant work on this script which is available for download at www.quadtonerip.com.
Since recent versions of Photoshop will not let us select our profile in the Print dialog, alt-photo printmakers tend to print with the free QTR Print Tool application that allows us to select our profile and the “Perceptual” rendering intent at the time of printing.
You can also use this profile for soft proofing in Photoshop. Choose “View>ProofSetup>Custom…” and select for printer profile with Perceptual and Black Point Compensation. “Simulate Black Ink” and “Simulate Paper Color” do an excellent job at simulating the paper color and the lighter blacks of your alt photo process. If you check “Preserve Color Numbers” you will see how badly your images print *without* this profile.
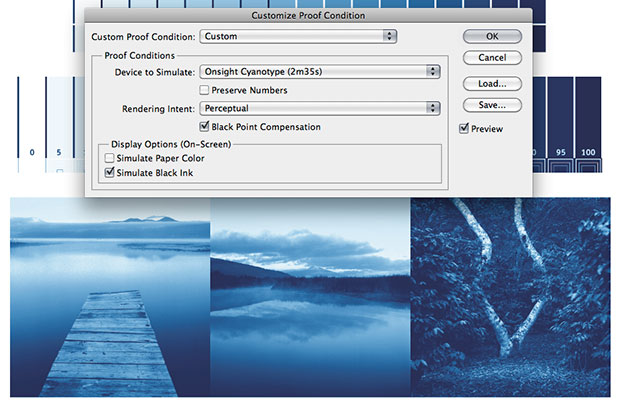
Softproofing with a QTR Grayscale profile displays the image with full color/hue and Dmax simulation
[optional] If QTR-Create-ICC won’t make a profile, open up the measurement file in a text editor and checkout the leftmost column of numbers that contain pertinent Luminosity channel numbers. If any of these numbers aren’t sequential QTR-Create-ICC can’t make a profile. If this occurs you probably have an anomaly in one of your measurements that you can manually fix in the text editor. I sometimes find a single patch in the shadows that is slightly out of sequential order, and adjusting this value so that QTR-Create-ICC can make a profile has no detrimental effects. [I used to do this occasionally when using the i1Pro, but haven’t seen the need when using the newer i1Pro2 and iSis2 devices]

Measurement file with non-sequential value that should be corrected to 7.71
Of course, my clients that would rather not invest in a spectrophotometer and all this geek stuff can utilize my private remote profiling service. While I think most will want to do this themselves, it’s always good to have options. I hope this is useful – enjoy making grayscale profiles!
– Scott Martin

Scott:
No, nothing like that. Just curious about whether there were open source Java scripts or something similar out there that did essentially the same thing. I am always curious about the “nuts and bolts” of things.
BTW, I just can’t get over how much easier it is to profile instead of trying to derive curves. I have been getting prints just right on the first try that previously had taken many trials to get (and I thought I had derived some pretty decent curves). The ability to soft-proof is also icing on the cake; while not perfect, it gets you a pretty decent representation of the tonal scale of the resulting print.
Thanks again,
Brian
Well, a profile is just a set of curves and a few other useful things encapsulated in an ICC wrapper. It’s a much more useful, evolved, modern day curve if you will!
Scott:
By the way, are there any programs or scripts out there written in Java, Python, Matlab, or whatever that do essentially what “QTR-Create-ICC” does?
Thanks,
Brian
Nope, there’s nothing like "QTR-Create-ICC". Can I ask – what are you thinking? Are you wanting to take it online?
Scott:
I followed your steps and was able to produce a great profile that so far is allowing me to make some pretty nice platinum-palladium prints. I am used a rather aged i1Pro but it still works very well. So far, it is far better than trying to derive and use curves for creating digital negatives.
Thanks so much.
Brian
Thanks for saying so Brian! It’s simplicity and accuracy can’t be beat right? Ancient i1Pro’s work great…
Thank you Scott, appreciate your prompt feedback.
Peter
Thanks Scott I now have Print Tool, very elegant I must say. Ok so reading your above article, which target is compatible with your script. Is it the “21 step grayscale linearisation” or the 21random ??
Hi Peter! It’s compatible with the 21 step wedge found in my greyscale and alt-photo process targets that you can download at http://www.on-sight.com/downloads/ Hope this helps!
Hi Scott I am new to QTR B&W profiling and came across your old article from 20012 – Using i1Profiler for QTR grayscale measurement and profiling. I have an i1 Pro device (the old one) but have the latest i1 Profiler software licensed to me. As I say I am new so its all a little confusing. I have downloaded the 21 and 51 greyscale files and installed them, but how do I print them out in order to measure them? I am using a Mac – El Capitan.
Hi Peter, and good question. Since Adobe has done a royal job screwing up and removing useful options in Photoshop’s Print dialog box, Roy Harrington’s ‘Print Tool’ app has become a favorite in the Alt-Photo printmaking community. Its wonderfully simple, has full grayscale profile support, and a No Color Management option for printing profile targets.
http://www.quadtonerip.com/html/QTRprinttool.html
Answering my own question: yes, the best workflow now would be convert the positive to profile in photoshop, invert and op and print in the new QTR Print Tool. Excellent negative!
All on MacOS 10.8.2
Kees
Excellent question Kees. Adobe has made a bunch of changes in the way Photoshop handles greyscale files in recent versions and the the print dialog box has changed a lot too. Apple has changed their printing architecture as well. All of this makes things a lot more complicated than it used to be. And it makes it challenging/impossible for someone like me to recommend one workflow that works for all OS's and versions of Photoshop.
I too am excited about QTR Print Tool, and have been beta testing it from the start. I leaning towards encouraging all alt-process printmakers towards using it. My tests with it have come out great so far but I need a broader range of experience with it before I proclaim 'its THE way to go'. Things are leaning in that direction. Time will tell if it's as bullet proof as I hope it is across a broad range of computers. Glad it's working as well for you as it is for me!
Hi Scott,
What would be the best workflow for using these soft proof icc profiles for finetuning alt. photo printing. Currently I convert my (gamma 2.2) images to the soft proof profile and send the positive to the printer with ‘print negative’ checked in the photoshop output dialog and ‘photoshop manages colors’ with the same proflle selected in . But I’m not completely shure the OS doesn’t interfer here.
Today I downloaded Roy Harrington’s new QTR print Tool application and this looks much more straight forwarded. I convert the image to the profile, invert the image in Photoshop and open this negative in the QTR printing Tool. Then printing whitout profile is very easy!
What do you think of this?
Kees
Ah, the root level … yup, there it is – thanks Scott.
Scott – great web site – thanks for sharing all this useful information, much appreciated.
Now, I’m feeling a tad stupid here, but – look as I might – I just don’t have the X-Rite folder inside my ApplicationSupport folder (on Mac OSX 10.8) so I’m stumped as to where to put your workflow files.
i1 Profiler is installed and working perfectly … is the X-Rite folder hidden by default?
Library>ApplicationSupport>X-Rite>i1Profiler>ColorSpaceRGB>MeasureReferenceWorkflows
is the correct location for Mac OS. That’s the main Library at the root level of the hard drive – not the User Library in the User’s folder.
Another thing that’s confusing is that if you have older XRite software installed you may actually have two XRite folder in Library>ApplicationSupport> One with a hyphen and one without! Look above your “XRite” folder and see if you have a “X-Rite” folder – that’s where you’ll want to be!
I will say that I haven’t done this under 10.8 yet so please let me know how this works out!
Thank you Scott for the very helpful information about using my new Eye One Pro 2 software to make grayscale readings. I’ve struggled with this all week until I found your article.
What I am attempting to do right now is to linearize a BowHaus True Black and White curve for one of my gloss fiber Harmon papers. BowHaus gave me the work flow for using an Eye One to do this directly within their software. Unfortunately the new version of this spectro is not being recognized by their rip software, so my only way to do it now is with the X-Rite software, which I wasn’t able to do until I found your article. I will try it tomorrow.
Thank you so much,
John
Thanks. I would encourage BowHaus to support the i1Pro2. The more support the better.