![]()
ColorPort is free utility from XRite that allows users to make and measure profiling targets with a wide variety of spectrophotometers, including the versatile 1Pro. This software and hardware combination is the modern day equivalent to yesterdays densitometer that provides much more information and functionality. I've been using ColorPort on a daily basis since 2005 and love it's flexibility and versatility. If one is savvy enough to hack color patch spreadsheets and XML files, one can design beautiful targets for nearly any profiling purpose. I've preferred ColorPort over MeasureTool for years, but now that XRite has discontinued MeasureTool and the Mac OS will no longer launch it; color geeks everywhere are making the switch.
B&W inkjet printmakers and Quad Tone RIP (QTR) users in particular will love to hear that I’ve just made it easier than ever to ditch MeasureTool and start using ColorPort. Visit www.on-sight.com/downloads/ to download the 21 and 51 step gray ColorPort XML files that I’ve made for the i1Pro and iSis. These files can be installed at the following location:
Mac OS: [user folder]>Documents>ColorPortResources>refs>cmyk
Windows: C:Documents and SettingsAdministratorMy DocumentsColorPort_Resources
efscmyk\n
I’ve also made my Grayscale and Alt-Process profiling targets available with patches for the i1Pro, and iSis and DTP70 patches on separate layers that can be enabled. These profiling targets have large 21 step patches that come in handy with irregular alt processes and some images to help monitor the tonal scale during testing. The values of the 21 and 51 step targets are exactly the same as those from QTR. Feel free to use these targets for non-commercial purposes.
With the XML files installed, launch ColorPort, and choose the target you wish to measure. i1Pro users should then click on the circular “i” to the right of the measurement device, choose spot or strip reading (I prefer spot measurements), calibrate your device and begin measuring the target patches.
If you click on the circular “i” to the right of the measurement status, you’ll see a nice window that shows your measurements in a variety of modes. Some will appreciate the densitometric values while others might like the spectral visualization of each patch.
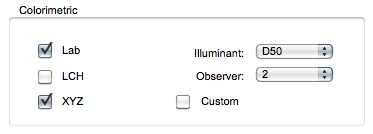
Once your measurements are complete, click the “Save Data” button on the lower right. Choose “Tab Delimited” for the format, leave the conversion on XRGA, and make sure that the only checked boxes are “Lab” and “XYZ” with the Illuminant set to “D50” as pictured here. Save your measurement file.
You now have a measurement file that you can drag and drop onto the “QTR-Create-ICC” script to make an ICC Color Profile for your grayscale printing process! Of course, QTR users can also drag and drop this measurement file onto “QTR-Linearize-data” and use the linearization curve in QTR. Tip of the hat to Roy Harrington for his brilliant work on this script which is available for download at www.quadtonerip.com. Roy’s grayscale profiles can be used for soft proofing in Photoshop complete with hue and paper color simulation.

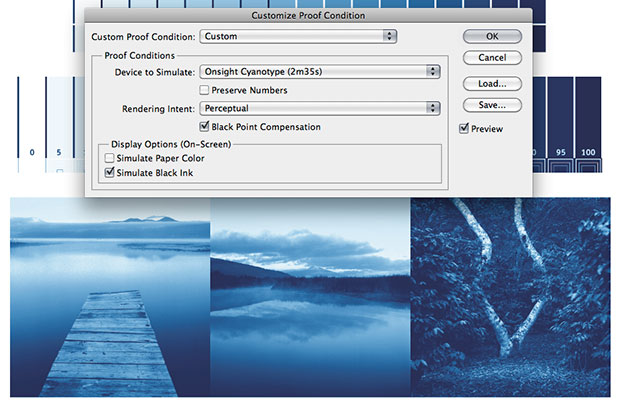
Softproofing with a QTR Grayscale profile displays the image with full color/hue and Dmax simulation
You can also use this profiling process to color manage Advanced B&W printing modes and alt-process negatives. More on this in another article soon.
If you choose to open up this measurement file in a text editor, the leftmost column of numbers contain the pertinent Luminosity channel numbers. If any of these numbers aren’t sequential QTR-Create-ICC won’t make a profile. If this occurs you probably have an anomaly in one of your measurements that you can manually fix in the text editor. I sometimes find a single patch in the shadows that is slightly out of sequential order, and adjusting this value so that QTR-Create-ICC can make a profile has no detrimental effects.

Measurement file with non-sequential value that should be corrected to 7.71
Of course, my clients that would rather not invest in a spectrophotometer and all this geek stuff can utilize my private remote profiling service. While I think most will want to do this themselves, it’s always good to have options. I hope this is useful – enjoy making grayscale profiles!
– Scott Martin
Update 4-26-12 XRite has upgraded ColorPort to version 2.0.5 to address some issues some users were experiencing and to support the new i1Pro2 device.


Hi, I have dtp70 and wish to create new bw profile for ilforf gfs, not sure which target / xml is best to use, any pointers? Thanks
Hi Michael! The profiling targets are pretty simple – just download the v9 target and enable the Photoshop layer for your DTP70. The XML file for ColorPort is a little more complicated. I’ve created XML files for the i1Pro and iSis but never bothered to make one for the DTP70, and now that I can’t launch ColorPort I won’t be able to do so. Can you Ninja one up? XML files aren’t complicated, but hacking a new one can be a little tedious. Open the i1Pro XML file and a DTP70 XML file. Stare at it long enough and you’ll see what you need to do. If you can manage it, send it to me so I can include it here. Thanks!
PS: There hasn’t been much interest in using the DTP70 for this process – you might be the first!
Hi Scott,
I used your 21 step target, color port, and the i1Pro and was able to linearize a qtr curve.
A friend has a Color Munki. Can he use that to read your 21 step file?
Thanks, Doug
Sorry, the Munki is a budget device that’s outside of the i1 family and therefore can’t be used with any software except ColorMunki. Snag a used i1Pro if you can – lots of them out there!
Now that ColorPort 2.0.5 has been released do you have some updated instructions for the new software or at least have the folder address instead of:
Mac OS: [user folder]>Documents>ColorPortResources>refs>cmyk
As this no longer exists.
Thanks
ps. GREAT instructions
Thanks for your comment. XRite hasn’t changed the location of these folders in nearly a decade. I installed CP 2.0.5 when it came out and I’ve still got those folders and the files are working great there. Go ahead and make these folders if you’re not seeing them.
FWIW, XRite has upgraded ColorPort to 2.0.5 to address some of the issues previously discussed and to support the new i1Pro2 device. Get it here:
http://www.xrite.com/product_overview.aspx?ID=719&Action=support&SoftwareID=1168
Scott Martin
http://www.on-sight.com
update: contacted xrite and they provided a workaround for what apparently is an installer bug in colorport 2.0.3:
“There is a bug in the Mac installer of the ColorPort software we are working on. To go around this, please right click on the installer package and go to “Show Package Content”. You can install the software out of the package content then.”
Now I have a working copy.
You beat me to it. Yep, I’ve reported a number of small bugs to them – hopefully they will have an update soon.
It looks like Colorport 2.0.3 is not supported with Lion (MacOS 10.7.3). The installer won’t install it on my startup disk and when installed on an other disk the app crashes at launch.
Thanks.
David
Hi Scott,
which target / file should I print if I’m using ColorMunki? Does Colorport work with this spectrophotomer as well?
As a consumer device, the Munki isn’t supported in ColorPort. However, check out this article about using the Munki for this purpose: http://bit.ly/aXHbKE
Thanks for that. I have been building QTR profiles using Argyll CMS and an i1 so am interested in this. I have a question though. QTR Create ICC can make a monochrome profile but it will be positive, to be useful for making digital negatives (rather than soft proofing) the profile must be applied to a negative image. Is there an easy way to convert a curve from positive to negative. I am using the PDN curve calculator with normalised L* which may not be an ideal way of making a curve as it may not take into account print Dmax and the Yule-Nielsen effect, or something along those lines anyway.
I have an article coming out that will address making negatives for all kinds of alt-processes. To make a long story short – yes you can do it, and yes, using a spectro is super fact and easy and accurate in comparison to any curve method. Use the “Negative” and “Emulsion Side Down” checkboxes in Photoshop’s “Output” section of the print dialog box. More (much more) on this soon.