 Every time we upgrade Lightroom we have a great chance to get a fresh start, shed bad habits, and tweak our workflow. Customizing one’s process in Lightroom and reducing dependency upon Photoshop is the key to having a smart, efficient workflow that minimizes our time at the computer and maximizes time spent making images. I’ve been spending the last few months visiting with pros in their studios, auditing their workflows and getting them started on the right foot with Lightroom 4. Here’s are some of the common suggestions that I’m encouraging people to do:
If you haven’t already starting using LR4, launch LR3 and optimize your catalog(s) before using them in LR4. This isn’t a required step – it’s just a good idea. Quit, launch LR4, and open this
optimized catalog which will convert it to a LR4 catalog leaving the old one alone. There’s no need for you to do any manual backups or file duplications – Lightroom is doing this for you already.

Upgrade Lightroom 4.0 to 4.1, to access several goodies that weren’t quite ready for 4.0. Goto Help>CheckforUpdates… to initiate this process. All of the screen grabs you’ll see in this article are for 4.1
Set your background color to white when using the Develop module by right clicking on the background area (as shown below). This juxtaposition with paper white allows us to get a better idea how our images will print and helps avoid the “my prints are too dark” effect. Lightroom’s dark grey interface is wonderful to look at and use in all other modules but I think you’ll find it super helpful to leave it on white when developing images.
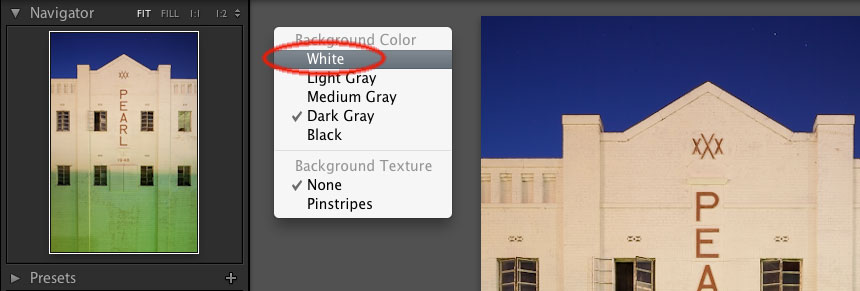
As a side note, checkout LR4’s excellent new Soft Proofing feature in the Develop module that also converts the background to white. Feel free to set the background to the more pleasing dark grey when using the other modules.

Check the “Automatically write metadata into XMP” checkbox under the metadata section in the Catalog Settings. This checkbox is off by default but I’ve long encouraged my clients to check it. The performance penalty is insignificant on new computers, relative to it’s benefits. By embedding your Lightroom work directly into your image files in addition to the catalog, you’re lessoning the likelihood of disaster should your catalog get corrupted or your images separated from it. I’ve witnessed a number of disasters that could have been avoided had this checkbox been checked, and similarly, seen a number of disasters averted due to it’s use.

I will add that you can alternatively embed your metadata by selecting images in the Library module and choosing Metadata>SaveMetadataToFile (Command-S Mac / Control-S Win)
Make a time-saving develop preset that you can use during each and every import session to reduce common Develop module adjustments. If you haven’t made Develop Module presets before, now is the time to get started. It will save you from the repetitive tasks you’re probably doing in the Develop module everyday and speed up your workflow. Here are the minimum items I suggest including in your import preset:
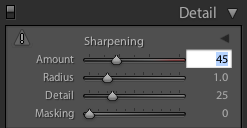
1) Sharpening Amount. Since sharpening is so subjective, everyone has a favorite sharpening amount value. This value can also vary on a per-lens basis. Regardless, if you find your self using one number quite often you might as well save it as your default.
2) Remove Chromatic Aberration. Fixing Chromatic Aberrations is now as easy and checking a checkbox. It works fantastically well, and fixes more kinds of aberrations than ever. Why its unchecked by default is beyond me. [The chromatic aberration pictured below is as it appears in LR 4.1 which is slightly different than the way it appeared in LR 4.0] Read more about chromatic abberation and the new de-fringing tools. If you regularly use Lens Profiles, you could also enable them under the Profile tab.

3) Set vignetting parameters for better vignettes. I personally find Lightroom’s midpoint and feathering defaults to be rather poor. Because I use subtle vignettes often and want them to look good, I like to dial the midpoints down and crank the feathering up. I recommend setting the Lens Vignetting to -1,0 and the Vignette Effects sliders to -1,0,0,100,0 as pictured here:

5) Include any other trends in your development process. If, for example, you find yourself dialing the Vibrance down to -5 for 90%+ of the images you develop, put this in your preset so that all of your images have these settings immediately after import. The idea here is to save time and automate trends in your development process.
Save a Develop preset with these preferences, by clicking on the + button in the presets panel in the left panel.
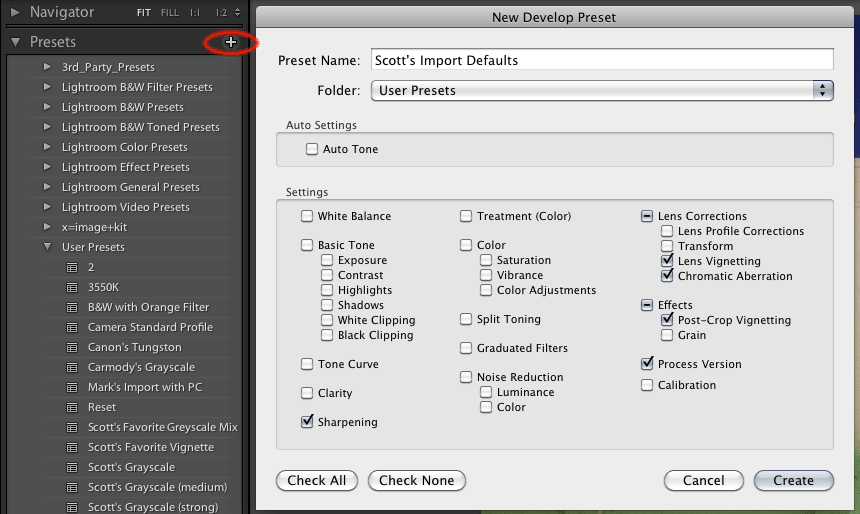
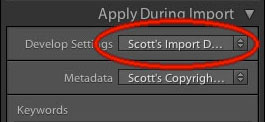
Next time you import images select this preset in the Import dialog box as pictured here:
Lastly, if you work with critical color or use unusual lighting, you might consider making custom DNG profiles for your camera and lighting scenarios. Not everyone benefits from doing so, especially those that are in the “pleasing color” business. But color critical catalog photographers and those that make images in weird artificial lighting will see nice, if modest, improvements from making custom camera profiles. The XRite ColorChecker Passport is a $99 passport sized device that comes with easy to use software for this purpose. A lot of my clients keep one in their camera bag and use them when needed. Naturally I can walk you through this process if you’d like.
That’s it! Wishing you a smart, efficient workflow and great moments worth sharing.
– Scott Martin


Great advice. Thanks for sharing
Bill